Thursday, November 10, 2011

Computer Projects


Summary
This post is a listing of any completed or ongoing projects as well as a running tally of completed computer repairs.

Description
The accomplishment of finishing a project is a great thing.  It's awesome to start from imagining a new project to completing it.  This is especially true if I had no experience before starting.  Often times, between work and school, this sense of accomplishment is lost to quickly focusing on new problems.  Posting the major projects is both for reflection and maybe it helps someone else. If there is interest in a tutorial from one of the projects listed, let me know!

Below the projects is a section of repairs.  Repairs are accepting an unusable computer from somebody and making it a working computer.  A repair is a project but are excluded from the project list as the final product of a repair is always the same, a working computer.  I do these repairs because I believe computers greatly increase the quality of life.  Unfortunately, a machine could become completely unusable at any moment and not everyone knows what to do or may not have the financial means when their computer becomes unusable. If you can make computer repairs, have a little extra time, and get approached by anyone that needs help, I would encourage you to take the extra time and help.  Repair projects are both rewarding and a great source of learning experience.

The Projects
Almost all of these projects were written after June 2011.

Name: Project Mendel
Goal:Complete multiple tasks related to genetics. Determine if something is due to chance (better than chi-squared test). Perform a test cross using a punnett square diagram.
Concepts:Math for genetics, C# Winforms, Java, string manipulation


Name: Sequence Cutter
Goal:In a 40 page document full of nothing but the letters A, T, G, C, N, remove and label the data between each set of N characters. (Remove all non-read sequences from sequence data).
Concepts:C# Winforms, Java, Generics, Queues


Name: RC Car Hack
Goal:Pair a broken remote control (RC) car with an arduino and PC, through bluetooth to control with simple keypress or xbox 360 controller.
Concepts:C#, Winforms, Bluetooth, System.IO.Ports, Arduino, Motor Driver


Name:Arduino Vending Machine - Accepting Dollar Bills
Goal:Use a bill validator (BA-30) and Arduino to show when a bill has been accepted.
Concepts:C#, Winforms, System.IO.Ports, Arduino, Bill Validator


Name: Image Viewer
Goal:Display all available images from a designated folder in an ASP.NET site
Concepts:C#, ASP.NET, MS SQL Server 2008, GridView control, DirectoryInfo, FileInfo


Name: Word Counter
Goal:Get the count of words from the page source of any specified webpage in order to analyze or make associations with the content
Concepts:C#, Winforms, ASP.NET, HtmlAgility Library, Dictionary object


Name: Contact Us
Goal:Send an email filled with user input
Concepts:C#, Winforms, ASP.NET, SmtpClient, MailMessage


Name: Message Station
Goal:Send text messages (SMS), of unlimited length, to a contact picked from a saved list.
Concepts:C#, Winforms, SMS Gateway, SmtpClient, Queue, System.IO.File


Name: PDF Form Filler
Goal:Take user input and fill fields in an existing PDF file
Concepts:C#, ASP.NET, ITextSharp Library, SmtpClient, MailMessage, Android, WebView


Name: Mobile Learning Center
Goal:On Android, create an application that only uses HTML for presentation. Additional HTML modules can be added/downloaded to extend the application (Dynamic) while running.
Concepts:Android, Download Manager, HTML, java, java.io.*, java.util.zip.*, ASP.NET


Name: Android FTP
Goal:Upload a text file via FTP
Concepts:Android, Java, java.io.*, java.net.*, Apache Commons Net Library


Name: Agricultural Surveyor (IN PROGRESS)
Goal:Make a platform to collect data from agricultural areas using an automated quadcopter, ardupilot mega, and android phone. Analyze, manipulate, and present data collected using C#/ASP.NET. Store data using MS SQL Server 2008.
Concepts:ASP.NET, MS SQL Server 2008, GridView, DirectoryInfo, FileInfo, Android, Intents/Broadcast receivers/Content Provieders for SMS and sensor information, Arduino, hobby hardware


Name:Scrape Web Info System
Goal:Get links from a search, separate all words from each page retrieved, and count all the words.   
Concepts:ASP.Net, C#, MS SQL 2008, HtmlAgility Library


Name:Maximum Data Rate of a Channel
Goal:Calculate the maximum data rate of a channel according to Nyquist and Shannon.  
Concepts:Android, Java, static methods


Still working on listing more....


Repairs
2011

  • Hardware Replaced
    • Hard drives - 5 (includes either reimage, clone, or file transfer)
    • Optical drives - 2
    • RAM - 3
    • Graphics Card - 1

  • Malware Removal - 8
  • Network problem resolved - 6
2012

  • Hardware Replaced
    • Hard drives - 1 (includes either reimage, clone, or file transfer)
    • Optical drives - 0
    • RAM - 0
    • Graphics Card - 0

  • Malware Removal - 2
  • Network problem resolved - 2

Saturday, November 5, 2011

ASP.NET - Add Membership Schema to Existing Database

Summary
This tutorial shows how to add all the membership stuff to an existing data and use it in an ASP.NET Web Application.

Description
The goal here is to easily add all the ASP.NET membership tables and related info to an existing Microsoft SQL Server 2008 R2 database and use this database in an ASP.NET Web Application.  Plainly, this means updating an existing MS SQL 2008 R2 database with stuff needed to allow users of the ASP.NET application to do things like login. 

Before we begin
For the tutorial, you'll need the following:

Visual Studio 2010 Web Developer or Professional - When we start a new ASP.NET Web Application project it will be in C#. 

Microsoft SQL Server 2008 R2 - You'll need at least the express edition installed, a database created, and a user.  The database can be a normal new database.  The user must use "SQL Server Authentication".  If you want to know how to create a new database, new user, and assign the user a role from the new database then see the previous tuorial here

Microsoft .NET Framework 4.0 - This is good to have, find it here and install it.  This tutorial is based on .NET 4.0.

Steps


  1. Find the "ASP.NET SQL Server Setup Wizard"
  2. Run the Wizard
  3. Start a new ASP.NET Web Application
  4. Open the Web.config file
  5. Modify the Connection String
  6. Done!!  Hit F5, make a new user, Login, Logout, Login
  7. Not convinced?  Check the database.
  8. Done, for reals.

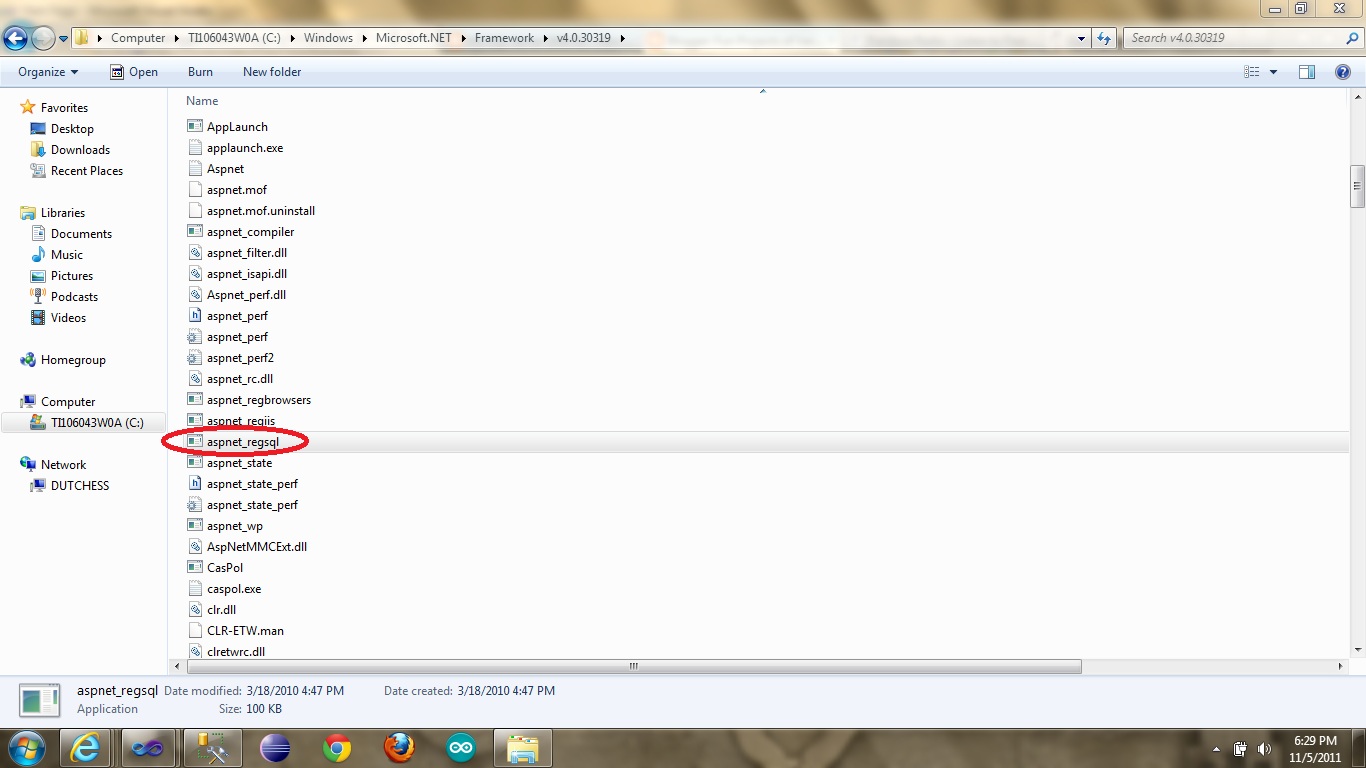
1.  Find the "ASP.NET SQL Server Setup Wizard" - Open your C drive (or find your windows directory).  For me, the location is "C:\Windows\Microsoft.NET\Framework\v4.0.30319".  In the picture below, you'll see the other versions of .NET.  We want to choose "v4.0" because our ASP.NET Web Application project will use the .NET 4.0 Framework (Figure 1.1).  Within this folder find a file named "aspnet_regsql.exe" (Figure 1.2).


Figure 1.1
Figure 1.2

2.  Run the Wizard - Open the file from above, "aspnet_regsql.exe".  The wizard will start and the first page comes up.  Read it or not but click the "Next" button.  The next page says "What database task do you want to perform?".  On this page select the radio button next to "Configure SQL Server for application services" (Figure 2.1) and click Next. 

Figure 2.1


For the next page, we'll need to specify the Server, authentication type, user name, password, and select a Database.   The goal of this page is to find the existing database.  If you're lost here, I recommend going through the previous post here.  I'm assuming you went through the previous post.  This information we use here (Figure 2.2) should be the same we used to test the new user in the last step of the previous post.  NOTE:  Fill out the username and password before selecting a Database.  The username will be "mytestuser", the password will be "password", and select "TestDatabase" from the drop-down box for our database.   Just to compare the last step of the previous post to this one, here's the login information we used for our test server (Figure 2.3)

Figure 2.2
Figure 2.3 - Compare with 2.2


After the settings are filled in, click Next.  If you're sure click Next again. When it's finished, click Finished.  That's it, for the first part.

3.  Start a new ASP.NET Web Application Project - Open Visual Studio and start a new project.  Start a new ASP.NET Web Application, for the name use "LoginApplicationDemo" (Figure 3.1).  Do not select the "ASP.NET Empty Web Application",  we will be using the awesome default login setup with master pages.  Select the OK button.

Figure 3.1
4.  In the or new project, open the Web.config file. In the Web.config file, the "connectionStrings" tag we want to work with next is at the top (Figure 4.1).

Figure 4.1


5.  Modify the Connection String - We will add the following to replace the default connection tag in step 4 (Figure 4.1).  We are replacing this with a connection string that points to the existing database (TestDatabase) that we are going to use with this project (LoginApplicationDemo).  Our new connection string looks like this:

<conectionStrings>
  <add name="ApplicationServices"
connectionString="Data Source=DUTCHESS;Initial Catalog=TestDatabase;User Id=mytestuser;Password=password;"
           providerName="System.Data.SqlClient" />
</connectionStrings>

  You can see the new connection string in place in Figure 5.1.  What does this connection string mean?  Well, it's all relative to the other steps.  The "Data Source" was known as "Server Name".  The "Initial Catalog" was known as the name of the "Database".  The "User Id" was "Login" or "Username".  The "Password" is... well just compare the login information of Figure 5.1, Figure 5.2, and Figure 5.3.  Also, our new Web.config file is shown in Figure 5.1.

Figure 5.1
Figure 5.2
Figure 5.3
6.  Done!! Hit F5, make a new user, Login, Logout, Login - That was it.  (Figure 6.1, 6.2, and 6.3) Debug > Start Debugging (F5).  When you site comes up in your favorite browser, create a new user, logout, and login again.  You can even close the browser, stop debugging in Visual Studio.  To prove it's still in the database, select Start debugging (F5) again, and log into the site (Figure 6.1 and 6.3)


7.  Not convinced? Check the database. - Before completing this step, make sure you have completed step 6.  We're going to check the database (TestDatabase) for the new user created in step 6.  Open Microsoft SQL Server Management Studio, log in as "mytestuser" (Figure 7.1).  Click on "New Query" (Figure 7.2).  From the available databases drop-down list (currently says "master"), select "TestDatabase".  In the query area write "select * from aspnet_Membership;" and "Go;" (Figure 7.3).   Finally, click the "Execute" button and see your results towards the bottom of the page.  Scroll through this result, it is the user that you registered in step 6.

Figure 7.1


Figure 7.2
Figure 7.3

That is all.  I hope this tutorial has been helpful to you.

Comments/Questions?
I'm always wanting to improve the quality of the content here. If you have questions, want to see a better explanation, a better picture, let me know. Thanks - Sean

MS SQL Server 2008 R2 - New Database and User

Summary:
This tutorial is about creating a new user, new database, and assigning the new user a role in Microsoft SQL Server 2008 R2.


Description:
We will do a step-by-step walkthrough of how to add a create a new database, create a new user, and add the user to the "db_owner" role for the new database in Microsoft SQL Server 2008 R2.


This is one of the first steps in starting to use Microsoft SQL Server 2008 R2.


Before we start:
This tutorial assumes you have Microsoft SQL Server 2008 R2 Express Edition installed.  I assume you enabled Windows Authentication and have a default instance of SQL Server.

Steps:


  1. Open MS SQL Server 2008 R2
  2. Connect as Admin
  3. Create a TestDatabase
  4. Creating the New User
  5. The New User's Role
  6. Done!! Login with the new user

1.  Open MS SQL Server 2008 R2 - Go to 'Start', 'Microsoft SQL Server 2008 R2', and select 'SQL Server Management Studio'.


2.  Connect as Admin - If your installation went well, you should be able to set "Authentication" to "Windows Authentication", server name to "(local)", and click the "Connect" button.  As one alternative, you can use your computer name as the server name.  Another alternative is to click the drop-down box for server name, select "browse", and find your server name under "Database Engine". 


3.  Create a TestDatabase - On the left-hand side is a section called the "Object Explorer".   In the Object Exporer, right-click on "Databases", and select "New Database...".  A new window appears named, "New Database". 


In this window, find the textbox labeled "Database name:" and write "TestDatabase".  After this, click "OK" to create the new database. 


4.  Create the New User - Go to the Object Explorer and open the Security folder.  Inside, you will find a folder named "Logins".  Right-click on the folder named "Logins" and select "New Login".


For the login name, type "mytestuser".  Below this, select the radio button labeled "SQL Server authentication".  In the Password boxes, type "password" or something easy to remember. NOTE: It's not good practice to use easy passwords like this, but this is just for learning.  Next, make sure the following three checkboxes are not selected: "Enforce password policy", "Enforce password expiration", and "User must change password at next login".  Lastly, on the left-hand side under "Select a Page", select "User Mapping".  Don't select the OK button yet... move to the next step.


5.  The New User's Role -  Before we create the new user, we want to make the new user a member of the "db_owner" role for the table we created in step 2.  After selecting "User Mapping" in the previous step, look for your database "TestDatabase" from step 2 in the top half of this window.  Next to the name "TestDatabase" is a checkbox, select this check box.  With this checkbox selected and this row highlighted, the bottom half of the current window will show all of the "Database role membership for: TestDatabase".  In this area, click the checkbox next to "db_owner".  Now, select the OK button. 


6.  Done!!  Login with the new user - The database, user, and mapping are all done.  We now need to test everything we've done by logging in using the new user we've created and access the new database.  So.. Close and reopen Microsoft SQL Server Management Studio.  (Another way is to select "Disconnect Object Explorer" and then select "Connect Object Explorer" under "File" menu.)  Either way, the login screen should appear.  In the drop-down box labeled "Authentication", select "SQL Server Authentication" from the drop-down box.  Now, the "Login" and "Password" boxes will become enabled.  For login, type the name of the user we created, "mytestuser". For password, type the password we used, "password".  Select the "Connect" button.  That's it!  Lastly, if you want to make sure we assigned "mytestuser" the "db_owner" role, open the "TestDatabase".  If you can open this database, without error messages, everything should be good.  If you want to see what happens when you don't have permission, try to open any other database.


Comments/Questions?
I'm always wanting to improve the quality of the content here. If you have questions, want to see a better explanation, a better picture, let me know. Thanks - Sean