Thursday, October 11, 2012

Arduino - Control ESC/Motor (Arduino Code Ex.2)

The following code below is posted as another example of how to control more than one motor/esc with an Arduino.

I am using the Servo library to control two motor/esc.  The first motor is called the left and the second motor is called the right motor.  I send the speed in the following format (without quotes):

"l76;r88;n"

In the example above, "l76;" is the speed that I want to send to the left motor.  In the example above, "r88; is the speed that I want to send to the right motor.  In the example above, "n" is how I tell the arduino that the message is complete and done.  

When using the Servo library, we can arm the esc/motors by incrementally stepping up to 60.  NOTE:  This may vary for your esc/motor,  test with caution.  For me, setting the value above 65 put the motors in motion.  Writing anything less than 65 to the motors will stop the motors.  For this to happen,  

The code below is posted as additional content that is free to do whatever you want.  (use, manipulate, copy, learn).  I'm publishing this as something that is not as clean because I believe people want/need more examples.  There is one reference I have for this project that helped me to understand the arming procedure. I can't find it at the moment, and will post it later. 


 #include "Servo.h"  
 #define MOTOR_PIN  9 // This is the left motor  
 #define MOTOR_PIN_R           10  
 #define MOTOR_MAX_SPEED     90 // NOT REALLY NEEDED  
 #define MOTOR_START_SPEED        60  
 /*  
  * This is the max/min speed values restriction  
  */  
 int motor_left_minimum = 68;  
 int motor_left_maximum = 118;  
 int motor_right_minimum = 68;  
 int motor_right_maximum = 118;  
 int motor_current_speed = 0;  
 Servo motor; // This is the left motor  
 Servo motorRight;  
 String left;  
 String right;  
 void setup()  
 {  
  // 115200 default for blusmirf gold  
  //Serial.begin(115200);  
     // 9600 default for the xbee pro series1  
     Serial.begin(9600);  
  // Motor  
  delay(1000);  
  motor.attach(MOTOR_PIN); // This is the left motor  
     motorRight.attach(MOTOR_PIN_R);  
  motorStartAt(MOTOR_START_SPEED); // Arming procedure  
  delay(1500);  
 }  
 void loop()  
 {  
  //Serial.println("in loop");  
  if(Serial.available()>0){  
  //String myString = Serial.readStringUntil('\n');  
  //Serial.println(myString);  
   char ch = Serial.read();  
    if(ch == 'l')  
    {  
     do{  
      if(ch > 47 && ch < 58)  
       {  
       //Serial.print("I have received: ");  
       //Serial.print(ch, DEC);  
       //Serial.print('\n');  
       left += ch;  
       }  
       ch = Serial.read();  
      }while(ch != ';');  
    }  
    else if(ch == 'r')  
     do{  
      if(ch > 47 && ch < 58)  
      {  
      //Serial.print("I have received: ");  
      //Serial.print(ch,DEC);  
      //Serial.print('\n');  
      right += ch;  
      }  
      ch = Serial.read();  
      }while(ch != ';');  
    else if(ch == 'n')  
    {  
    int leftValue = left.toInt();  
    int rightValue = right.toInt();  
    Serial.print("Left value is: ");  
    Serial.print(leftValue);  
    Serial.print(" : ");// + " and " + right);  
    Serial.print("Right value is: ");  
    Serial.print(rightValue);  
    Serial.print('\n');  
    Serial.println();  
    if(leftValue >= motor_left_minimum && leftValue <= motor_left_maximum && rightValue >= motor_right_minimum && rightValue <= motor_right_maximum)  
    {  
     if(leftValue == motor_left_minimum)  
     {  
     motor.write(60);  
     //Serial.println("Left motor set to 60");  
     }  
     else  
     {  
     motor.write(leftValue);  
     /*Serial.print("Left motor set to ");  
     Serial.print(leftValue);  
     Serial.println();  
   */  
     }  
     if(rightValue == motor_right_minimum)  
     {  
     motorRight.write(60);  
     //Serial.println("Right motor set to 60");  
     }  
     else  
     {  
     motorRight.write(rightValue);  
     /*Serial.print("Right motor set to ");  
     Serial.print(rightValue);  
     Serial.println();*/  
     }  
    }  
    left = "";  
    right = "";  
    leftValue = 0;  
    rightValue = 0;  
   }  
  }  
 }  
 // Wrapper function for Servo's ".write(*speed*)" function  
 void motorSetSpeed(int speed)  
 {  
   // Don't let the motor go above or below pre-determined max and min  
  if (speed > MOTOR_MAX_SPEED)  
  speed = MOTOR_MAX_SPEED;  
  else if (speed < MOTOR_START_SPEED)  
  speed = MOTOR_START_SPEED;  
  motor.write(speed);  
     motorRight.write(speed);  
  motor_current_speed = speed;  
  //Serial.print("current motor speed = ");  
  //Serial.println(motor_current_speed);  
 }  
 void motorStartAt(int start_speed)  
 {  
  int i;  
  for (i=0; i < start_speed; i+=5) {  
  motorSetSpeed(i);  
  //Serial.println(i);  
  delay(100);  
  }  
 }  

Sunday, June 10, 2012

Arduino - Control ESC/Motor Tutorial


Summary
This is a tutorial of how to control an electronic speed control (ESC)and brushless motor using an Arduino.

Description
This tutorial is about controlling a brushless motor, the type commonly used in RC hobbies, and controlling the motor using an Arduino.  The goal is to use the Arduino Servo library, give an input from 0 to 180, and see the motor move based on our input.

Before we begin
Hooking up the Arduino to an RC hobby ESC is always the same.  The difference is that you will need to know how to arm your ESC.  This means you'll need to look for the manual that tells you how to arm your ESC.

When reading your ESC manual, you'll most likely notice that the literature/manual was written for people who have other RC equipment.  My manuals have always talked about the need to adjust the throttle in order to trigger an event like arming or programming modes.  We will be substituting the throttle with the input we give the Arduino.

Safety (always)
"You'll shoot your eye out" - A Christmas Story
Experimenting with the combined equipment of an Arduino, ESC, motor, and computer can cause harm to you or your equipment under certain situations.  Here's some items to consider for some of the components involved.

Motor
Make sure there is nothing attached to your motor (i.e. no props).  Don't test with props attached.  I jumped out of my chair, swearing, the first time the motor ran because I didn't expect it to work.  In custom trial and error, you never know what's going to happen.

Secure the motor to something while experimenting.  You don't want the motor jumping around when it unexpectedly comes to life.  If you need an ideal example, please how Ray29erau has his motor secured in his youtube video.

Protect Your USB ports
While an Arduino may be relatively cheap, let me save you a USB port.  No matter what you are thinking of doing, don't connect the positive line of your ESC to your Arduino pin labeled 5v.   If you connect your battery to the ESC, connect your Arduino to your computer by USB, and connect the gnd, signal, AND 5V into the Arduino..... you will probably damage (lose, fry, kill, etc) whatever USB port your Arduino is plugged into on your computer.   There's a good possibility you could lose the Arduino board too.  For a full explaination, please see "10 ways to Destroy an Arduino".... more specifically it's "Method #5".

Battery
General battery safety is recommended.  I'm using a lithium polymer (LiPo) battery.  If you want to know more on LiPo's, check out this page.  If you have a question or doubt about something you are doing with a LiPo battery, find someone who knows about the safe handling/charging of battery/LiPo's and ask.  For example, I bought mine from an awesome local hobby shop.  If I had questions about what I bought and the answers weren't included with the manual or couldn't be found online then I would ask the people that sold the gear to me.

D.) Other
This is the other category.  This is all meant to be fun.  When experimenting, there may be times you feel uncomfortable or unsafe about doing something in a project.  At times like these, find a person, forum, or group (Arduino forums linked) to ask and make your situation safe at all times.
 
Steps
Control the ESC/Motor using an Arduino
  1. Connect the ESC to motor.
  2. Connect the ESC to Arduino - pay attention or you will kill a USB port/Arduino (Protect Your USB Ports).
  3. Connect the Arduino to you computer.
  4. Upload your sketch to the Arduino.
  5. Use the Serial Monitor to arm the ESC
  6. Done!!! Do other stuff....


Begin
1. Connect the ESC to motor.

Simply enough, connect the ESC to the motor (Figure 1.1).  Notice that my yellow wire is in the middle.  Both the black and the red wires are on the outside.  If your ESC doesn't have colored wires (as seen on another ESC Figure 1.2), don't worry.  Getting the outside wires mixed up would only make the motor spin in the wrong direction.  There would be no harm in getting the outside wires wrong.  If you find your motor is spinning really fast when you think it should be stopped...  you only need to reverse the polarity between the ESC and motor.  


Figure 1.1 - Motor connected to ESC

Figure 1.2 - Two ESC's next to each other

2. Connect the ESC to Arduino.

Connect the Arduino's pin labeled "GND" to the ESC (Figure 2.1).  For this project, I am using pin 9 for the signal, yours may be different.  Connect the Arduino's pin labeled "9" to the ESC's white signal line (Figure 2.2).  That's it for step two.
As discussed in above in the safety section under "Protect Your USB Ports", DO NOT connect the Arduino pin labeled 5V to the ESC. (Figure 2.3)


Figure 2.1 - Arduino GND to ESC

Figure 2.2 - Arduino pin #9 to ESC

Figure 2.3 - DONT DO THIS

3. Connect the Arduino to your computer.
Connect the Arduino to your computer (Figure 3.1). It's super-easy.

Figure 3.1

4. Upload your sketch the Arduino.
Open up your Arduino IDE. Click here to open up the reference page (it has the Arduino sketch).  Copy the sketch on the reference page and paste it into your own sketch.  Upload the sketch to your Arduino (Ctrl + U).


5. Use the Serial Monitor to arm the ESC.

In the Arduino IDE, select "Tools" then select "Serial Monitor".  At this point, plug your battery into the ESC.  Your ESC will probably be different that mine.  This is where it's all about trial and error now.

Your ESC will be different but mine always gives a series of beeps.  According to the manual, the series of beeps tells me that the the ESC is on.  At this point, the manual (mine is found here) says the following:
"The  H . K i n g   ESC will not arm unless you
move your throttle stick to the lowest position. When
the H.King ESC receivesthe low throttle command, it
will arm and play a double tone through the motor,
indicating it is armed and now ready to run." 
Great.  I have no idea what this correlates to in the values from 0 to 180.  That's okay.  I did my trial and errors by typing numbers between 0 and 180 into the Arduino IDE Serial Monitor.  I tried the lows (0, 5, 10, 15, 20), the middle (90), and the high (170, 175, 180).  What I found was that sending "10" will arm the ESC and it will start spinning when I enter (send) "55" or higher from the Serial Monitor (Figure 5.1). Figure 5.1 shows what happens when I type "10" and then "55" into the Serial Monitor.

Be careful when doing trial and error with the motor.  When figuring out the ranges, high and low could be backwards.  For example, high might be "0" and low might be "180".  The first time my motor spun was when I sent 180, coincidentally I also found out that this was the high end of the range.

Figure 5.1
6. Done!!!  Do other stuff....

If you have figured out how to make your motor spin.  Congrats! It's a fun learning experience.  Most likely, you are trying to get your motor spinning for some other project and this was one of the first steps.  Good luck!


Arduino - Control ESC/Motor (Arduino Code)


Summary
This is only the Arduino sketch for the tutorial "Arduino - Control ESC/Motor Tutorial".  This is a tutorial of how to control an electronic speed control (ESC)and brushless motor using an Arduino.


/*
*  This code is in the public domain.
*  (Do whatever you want with it.)
*/

// Need the Servo library
#include <Servo.h>

// This is our motor.
Servo myMotor;

// This is the final output
// written to the motor.
String incomingString;


// Set everything up
void setup()
{
  // Put the motor to Arduino pin #9
  myMotor.attach(9);

  // Required for I/O from Serial monitor
  Serial.begin(9600);
  // Print a startup message
  Serial.println("initializing");
}


void loop()
{
  // If there is incoming value
  if(Serial.available() > 0)
  {
    // read the value
    char ch = Serial.read();
 
    /*
    *  If ch isn't a newline
    *  (linefeed) character,
    *  we will add the character
    *  to the incomingString
    */
    if (ch != 10){
      // Print out the value received
      // so that we can see what is
      // happening
      Serial.print("I have received: ");
      Serial.print(ch, DEC);
      Serial.print('\n');
   
      // Add the character to
      // the incomingString
      incomingString += ch;
    }
    // received a newline (linefeed) character
    // this means we are done making a string
    else
    {
      // print the incoming string
      Serial.println("I am printing the entire string");
      Serial.println(incomingString);
   
      // Convert the string to an integer
      int val = incomingString.toInt();
   
      // print the integer
      Serial.println("Printing the value: ");
      Serial.println(val);
   
      /*
      *  We only want to write an integer between
      *  0 and 180 to the motor.
      */
      if (val > -1 && val < 181)
     {
       // Print confirmation that the
       // value is between 0 and 180
       Serial.println("Value is between 0 and 180");
       // Write to Servo
       myMotor.write(val);
     }
     // The value is not between 0 and 180.
     // We do not want write this value to
     // the motor.
     else
     {
       Serial.println("Value is NOT between 0 and 180");
     
       // IT'S a TRAP!
       Serial.println("Error with the input");
     }
   
      // Reset the value of the incomingString
      incomingString = "";
    }
  }
}

Thursday, April 19, 2012

C# - Using the Command Prompt

Summary
This is a C# tutorial on how to interact with the command line programatically.

Description
Even now, the command prompt is used by many programs.  We can easily integrate the command line into our application.  If you can open the Command Prompt and execute a command, you can have your application do the same thing. 

In this tutorial we will explain how to use the command line inside our application.  We will create a command-line class that can be used in any scenario (Object Oriented Programming).  The Cmd.cs class is located at the end of the tutorial. 

Before we begin
I'm using Visual Studio 2010 on Windows 7 x64. 

According to Microsoft:

"Command Prompt is a feature of Windows that provides an entry point for typing MS‑DOS (Microsoft Disk Operating System) commands and other computer commands. The most important thing to know is that by typing commands, you can perform tasks on your computer without using the Windows graphical interface. Command Prompt is typically only used by advanced users."

Learn more by reading about the Command Prompt.

Steps
Command Prompt
  1. Setup a ProcessStartInfo object (Instance of the ProcessStartInfo class).
  2. Create a new Process and assign the ProcessStartInfo to it.
  3. Write commands to the process by using a StreamWriter.
  4. Read the output and errors (if any)
  5. Close the process
  6. Extra - The whole tutorial written as a handy static class.


Begin
1. Setup a ProcessStartInfo object (Instance of the ProcessStartInfo class).

We are creating a new ProcessStartInfo object (Figure 1.1).

 // Create an instance of the ProcessStartInfo class
ProcessStartInfo info = new ProcessStartInfo();
// Redirect input,output, and error
info.RedirectStandardError = true;
info.RedirectStandardInput = true;
info.RedirectStandardOutput = true;

// This must be set to false
info.UseShellExecute = false;
// This will open the command prompt
info.FileName = "cmd.exe";
// We don't want to create a window
info.CreateNoWindow = true;

Figure 1.1


2. Create a new Process and assign the ProcessStartInfo to it.

Next, we need to make the Process, give it the ProcessStartInfo, and start the Process (Figure 2.1)

// Make a new Process
 Process proc = new Process();
// Set the Process object's start info to the above StartProcessInfo
proc.StartInfo = info;
// Start the process
proc.Start(); 
Figure 2.1


3. Write commands to the process by using a StreamWriter.

Now that we have started the process we are going to write something to it.  In this case, the process we started was, "cmd.exe" and we will write commands to it using an instance of the StreamWriter (Figure 3.1).

In this case, we are writing two commands.  The first is "cd C:\windows\microsoft.net\" and it only changes the directory (cd) to "C:\windows\microsoft.net\".  The second command is to exit.
// The stream writer is replacing the keyboard as the input
// and we are tell the stream writer what to write
using (StreamWriter writer = proc.StandardInput)
{
 // If the streamwriter is able to write
 if (writer.BaseStream.CanWrite)
 {
  // Write the command that was passed into the method
  writer.WriteLine(@"cd C:\windows\microsoft.net\");
  // Exit the command window
  writer.WriteLine("exit");
 }
 // close the StreamWriter
 writer.Close();
}
Figure 3.1


4.  Read the output and errors (if any)

Now that we have said what we wanted to in the command prompt.  We should display the output and errors (if any) from the process (Figure 4.1). 

 // Get the output from the command line
string output = proc.StandardOutput.ReadToEnd();
// Get any Error's that may exist
string error = proc.StandardError.ReadToEnd();

// Write the output
Console.Out.Write("This is the output: " + output);
Console.Out.Write(Environment.NewLine);
Console.Out.Write("This is the error: " + error);

Figure 4.1


 5. Close the process

This is it! Close the process (Figure 5.1).


When we start debugging, we see the following output (Figure 5.2)


6. Extra - The whole tutorial written as a handy static class.

Below is the whole tutorial written as a class called Cmd.cs and has two static methods named Run.  One method accepts a command as a string and the other accepts multiple commands as a string array.  A string array is returned from both methods.  The error is always given in the first element of the return string array.  The output is returned as the second element of the return string array when the output is set to true.

Hope it helps


public static class Cmd
    {
        public static string[] Run(string command, bool output)
        {
            /*
             *  New array of two strings.
             *  string[0] is the error message.
             *  string[1] is the output message.
             */
            string[] message = new string[2];

            // ProcessStartInfo allows better control over
            // the soon to executed process
            ProcessStartInfo info = new ProcessStartInfo();

            // Input to the process is going to come from the Streamwriter
            info.RedirectStandardInput = true;

            // Output from the process is going to be put into message[1]
            info.RedirectStandardOutput = true;

            // Error, if any, from the process is going to be put into message[0]
            info.RedirectStandardError = true;

            // This must be set to false
            info.UseShellExecute = false;

            // We want to open the command line
            info.FileName = "cmd.exe";

            // We don't want to see a command line window
            info.CreateNoWindow = true;

            // Instantiate a Process object
            Process proc = new Process();


            // Set the Process object's start info to the above StartProcessInfo
            proc.StartInfo = info;

            // Start the process
            proc.Start();


            // The stream writer is replacing the keyboard as the input
            using (StreamWriter writer = proc.StandardInput)
            {
                // If the streamwriter is able to write
                if (writer.BaseStream.CanWrite)
                {
                    // Write the command that was passed into the method
                    writer.WriteLine(command);
                    // Exit the command window
                    writer.WriteLine("exit");
                }
                // close the StreamWriter
                writer.Close();
            }

            // Get any Error's that may exist
            message[0] = proc.StandardError.ReadToEnd();

            // If the output flag was set to true
            if (output)
            {
                // Get the output from the command line
                message[1] = proc.StandardOutput.ReadToEnd();
            }

            // close the process
            proc.Close();

            // return the any error/output
            return message;
        }

        public static string[] Run(string[] command, bool output)
        {
            string[] message = new string[2];

            ProcessStartInfo info = new ProcessStartInfo();

            info.RedirectStandardInput = true;
            info.RedirectStandardOutput = true;
            info.RedirectStandardError = true;

            info.UseShellExecute = false;
            info.FileName = "cmd.exe";
            info.CreateNoWindow = true;

            Process proc = new Process();
            proc.StartInfo = info;
            proc.Start();

            using (StreamWriter writer = proc.StandardInput)
            {
                if (writer.BaseStream.CanWrite)
                {
                    foreach (string q in command)
                    {
                        writer.WriteLine(q);
                    }
                    writer.WriteLine("exit");
                }
            }

            message[0] = proc.StandardError.ReadToEnd();

            if (output)
            {
                message[1] = proc.StandardOutput.ReadToEnd();
            }

            return message;
        }


    }


Monday, April 9, 2012

PowerSwitch Tail II and Arduino


Summary
Example of controlling the PowerSwitch Tail II, using an Arduino.

Description
This is an example of controlling the PowerSwitch Tail II, using an Arduino.  The PowerSwitch Tail II is a relay that is enclosed in a case.


Why?
Because we can easily control physical devices.

Before We Begin

PowerSwitch Tail II
This example uses using the PowerSwitch Tail II, you can find the product here:
http://www.sparkfun.com/products/10747

Arduino
This example uses the Arduino Duemilanove version of the Arduino board.  This board has been replaced by the Arduino Uno.  All Arduino stuff can be found:
http://arduino.cc/en/


Upload Code to Arduino
If you don't have the Arduino environment, download it from the Arduino site  (http://arduino.cc/en/Main/Software).  From here, copy the code from the bottom section labeled "The Code".  Paste this into your sketch and upload it to your Arduino.  Finally, from the menu, select "Tools > Serial Monitor".  With the code uploaded already, enter 1 or 0 to turn the device on or off.

Hooking it up
Simply enough here's how this works.

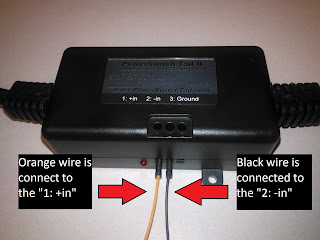
  1. In my example, pin 13 of the Arduino is connected (by the orange line) to the PowerSwitch "1: +in"
  2. In my example, Gnd of the Arduino is connected (by the black line) to the PowerSwitch "2: -in" 

Figure 1 - Arduino and Powerswitch Tail II

Figure 2 - Arduino 

Figure 3 - Powerswitch Tail II


The Code

char incoming_char=0;

void setup() {              
  // initialize the digital pin as an output.
  // Pin 13 has an LED connected on most Arduino boards:
  //pinMode(7, OUTPUT);
  Serial.begin(9600);
  pinMode(13, OUTPUT);  
  Serial.println("Setup has ended, entering loop()");
}

void loop() {
  if (Serial.available())
  {
 
 
    incoming_char=Serial.read(); // Get the incoming char
    if(incoming_char == '1')
    {
      digitalWrite(13, HIGH); // Turn the Powertail on
      Serial.println("Switch ON");
    }

    if(incoming_char == '0')
    {
      digitalWrite(13, LOW);    // turn the Powertail off
      Serial.println("Switch OFF");
    }
  }
}


Monday, February 20, 2012

Android App - Maximum Data Rate of a Channel


Summary
Code of an Android app to calculate the maximum data rate of a channel according to Shannon and Nyquist.

Description
This tutorial shows the code used to create an Android application.  The application calculates the maximum data rate of a channel.  The two following formulas being used are:

Nyquist
maximum data rate = 2B log2 V
B is bandwidth
V is levels

This is represented by "MaximumDataRates.NyquistMdr(bandwidth, levels)"

Shannon
maximum number of bits/sec = B log2 (1 + S/N)
This is represented by "MaximumDataRates.ShannonMdr(decibels, bandwidth)"
B is bandwidth
S/N is signal-to-noise ratio


This a plain application.  There are three parts to the application:

  1. Writing the MaximumDataRates.java class (static methods)
  2. Writing the MaximumDataRates_AndroidActivity.java (our main, and only, activity)
  3. Writing the main.xml file (res/layout/main.xml) for the presentation of the MaximumDataRates_AndroidActivity.java

Before we begin
For the tutorial, take a look at the following:

Shannon-Hartley theorem (wikipedia) - A more in-depth description.


What do you need to make it work? - When creating a new Android project in Eclipse, all you need to do is  add the package at the top, make sure your activity name.java matches the name used inside the activity.java file, and copy everything in this main.xml to your main.xml.

Any questions? Please ask!

Maximum Data Rate (static methods)


public class MaximumDataRates {

// private no-arg constructor
// driving home the point
private MaximumDataRates(){

}

static double NyquistMdr(double bandwidth, double levels){

return(2 * bandwidth * (Math.log(levels) / Math.log(2)));
}

static double ShannonMdr(double decibels, double bandwidth){

return (bandwidth * Math.log((FindSignalToNoise(decibels) + 1)) / Math.log(2));
}

static double FindSignalToNoise(double decibels){
return Math.pow(10, (decibels / 10));
}


}

MaximumDataRates_AndroidActivity.java


import android.app.Activity;
import android.os.Bundle;
import android.view.View;
import android.widget.EditText;
import android.widget.LinearLayout;
import android.widget.RadioButton;
import android.widget.TextView;


public class MaximumDataRates_AndroidActivity extends Activity {
    /** Called when the activity is first created. */


    // For the Nyquist TextBoxes
    LinearLayout nyquistGroup;
    EditText nyquistBandwidth;
    EditText nyquistLevels;
    TextView nyquistOutput;
    
    
    // For the Shannon TextBoxes
    LinearLayout shannonGroup;
    EditText shannonBandwidth;
    EditText shannonDecibels;
    TextView shannonOutput;
    
    // For the SNR TextBoxes
    LinearLayout convertDecibelsToSnrGroup;
    EditText snrDecibels;
    TextView snrOutput;
    
    @Override
    public void onCreate(Bundle savedInstanceState) {
        super.onCreate(savedInstanceState);
        setContentView(R.layout.main);
        
        // Nyquist
        nyquistGroup = (LinearLayout)findViewById(R.id.lnlNyquist);
        nyquistBandwidth = (EditText)findViewById(R.id.txtNyquistBandwidth);
        nyquistLevels = (EditText)findViewById(R.id.txtNyquistLevels);
        nyquistOutput = (TextView)findViewById(R.id.lblNyquistOutput);
        
        // Shannon
        shannonGroup = (LinearLayout)findViewById(R.id.lnlShannon);
        shannonBandwidth = (EditText)findViewById(R.id.txtShannonBandwidth);
        shannonDecibels = (EditText)findViewById(R.id.txtShannonDecibels);
        shannonOutput = (TextView)findViewById(R.id.lblShannonOutput);
        
        
        // Convert Decibels to SNR
        convertDecibelsToSnrGroup = (LinearLayout)findViewById(R.id.lnlConvertDecibelToSnr);
        snrDecibels = (EditText)findViewById(R.id.txtSnrDecibels);
        snrOutput = (TextView)findViewById(R.id.lblSnrOutput);
       
        hideAllGroups();


        nyquistGroup.setVisibility(0);


    }
    
    public void radioListener(View view)
    {
    RadioButton rb = (RadioButton) view;
   
    if(rb.getText().toString().equals("Nyquist"))
    {
    hideAllGroups();
    nyquistGroup.setVisibility(0);
    nyquistOutput.setText("");
   
    }
    else if(rb.getText().toString().equals("Shannon"))
    {
    hideAllGroups();
    shannonGroup.setVisibility(0);
    shannonOutput.setText("");
    }
    else if(rb.getText().toString().equals("Decibels to SNR"))
    {
    hideAllGroups();
    convertDecibelsToSnrGroup.setVisibility(0);
    snrOutput.setText("");
    }
   
   
    }
    
    public void calcNyquist(View view)
    {
   
    double bandwidth;
    double levels;
    String result = "";
   
    try{
    bandwidth = Double.parseDouble(nyquistBandwidth.getText().toString());
    levels = Double.parseDouble(nyquistLevels.getText().toString());
   
    result = Double.toString(MaximumDataRates.NyquistMdr(bandwidth, levels));
   
    nyquistOutput.setText(result);
    }
    catch(Exception ex)
    {
    result = "Something is wrong with your input";
    nyquistOutput.setText(result);
    }
    }
    
    public void calcShannon(View view)
    {
    double bandwidth;
    double decibels;
    String result = "";
   
    try{
    bandwidth = Double.parseDouble(shannonBandwidth.getText().toString());
    decibels = Double.parseDouble(shannonDecibels.getText().toString());
   
    result = Double.toString(MaximumDataRates.ShannonMdr(decibels, bandwidth));
   
    shannonOutput.setText(result);
    }
    catch(Exception ex){
    result = "Something is wrong with your input";
    shannonOutput.setText(result);
    }
   
    }
    
    public void convertDecibelToSnr(View view)
    {
    double decibels;
    String result = "";
   
    try{
    decibels = Double.parseDouble(snrDecibels.getText().toString());
    result = Double.toString(MaximumDataRates.FindSignalToNoise(decibels));
   
    snrOutput.setText(result);
    }
    catch(Exception ex)
    {
    result = "Something is wrong with your input";
    snrOutput.setText(result);
    }
   
    }
    
    public void hideAllGroups()
    {
    //outputGroup.setVisibility(0);
    nyquistGroup.setVisibility(8);
    shannonGroup.setVisibility(8);
    convertDecibelsToSnrGroup.setVisibility(8);
   
    }
}

Main.xml

<?xml version="1.0" encoding="utf-8"?>
<LinearLayout xmlns:android="http://schemas.android.com/apk/res/android"
    android:layout_width="fill_parent"
    android:layout_height="fill_parent"
    android:orientation="vertical" >
    

    <RadioGroup
        android:layout_width="fill_parent"
        android:layout_height="wrap_content"
        android:orientation="vertical" >
      
    <RadioButton
        android:id="@+id/radNyquist"
        android:layout_width="wrap_content"
        android:layout_height="wrap_content"
        android:onClick="radioListener"
        
        android:text="Nyquist" />
    <RadioButton
        android:id="@+id/radShannon"
        android:layout_width="wrap_content"
        android:layout_height="wrap_content"
        android:onClick="radioListener"
        android:text="Shannon" />
    <RadioButton
        android:id="@+id/radConvertDecibelToSnr"
        android:layout_width="wrap_content"
        android:layout_height="wrap_content"
        android:onClick="radioListener"
        android:text="Decibels to SNR" />
    </RadioGroup>
        
    <LinearLayout 
        android:id="@+id/lnlNyquist"
        android:layout_width="fill_parent"
    android:layout_height="wrap_content"
    android:orientation="vertical" >
    <TextView 
        android:id="@+id/lblNyquistTitle"
        android:layout_width="fill_parent"
        android:layout_height="wrap_content"
        android:text="Nyquist: MDR=2B log2 V"
        android:gravity="center"
        android:textAppearance="?android:attr/textAppearanceLarge" />

    <TextView
        android:id="@+id/lblNyquistBandwidth"
        android:layout_width="wrap_content"
        android:layout_height="wrap_content"
        android:text="Bandwidth" />

    <EditText
        android:id="@+id/txtNyquistBandwidth"
        android:layout_width="fill_parent"
        android:layout_height="wrap_content" >

        <requestFocus />
    </EditText>

    <TextView
        android:id="@+id/lblNyquistLevels"
        android:layout_width="wrap_content"
        android:layout_height="wrap_content"
        android:text="Levels" />

    <EditText
        android:id="@+id/txtNyquistLevels"
        android:layout_width="fill_parent"
        android:layout_height="wrap_content" />


    <Button
        android:id="@+id/btnNyquistCalculate"
        android:layout_width="wrap_content"
        android:layout_height="wrap_content"
        android:onClick="calcNyquist"
        android:text="Calculate" />
    
    <TextView 
        android:id="@+id/label1"
        android:layout_width="fill_parent"
        android:layout_height="wrap_content"
        android:text="Result"
        android:gravity="center"
        android:textAppearance="?android:attr/textAppearanceLarge"/>
    
    <TextView
        android:id="@+id/lblNyquistOutput"
        android:layout_width="fill_parent"
        android:layout_height="wrap_content"
        android:gravity="center"
        android:text="" />
    
    
</LinearLayout>
    
    <LinearLayout 
        android:id="@+id/lnlShannon"
        android:layout_width="fill_parent"
    android:layout_height="wrap_content"
    android:orientation="vertical" >
    
    <TextView
        android:id="@+id/lblShannonTitle"
        android:layout_width="wrap_content"
        android:layout_height="wrap_content"
        android:text="Shannon MDR=B log2 (1+SN)"
        android:gravity="center"
        android:textAppearance="?android:attr/textAppearanceLarge" />

    <TextView
        android:id="@+id/lblShannonBandwidth"
        android:layout_width="wrap_content"
        android:layout_height="wrap_content"
        android:text="Bandwidth" />

    <EditText
        android:id="@+id/txtShannonBandwidth"
        android:layout_width="fill_parent"
        android:layout_height="wrap_content" />

    <TextView
        android:id="@+id/lblShannonDecibels"
        android:layout_width="wrap_content"
        android:layout_height="wrap_content"
        android:text="Decibels" />

    <EditText
        android:id="@+id/txtShannonDecibels"
        android:layout_width="fill_parent"
        android:layout_height="wrap_content" />


    <Button
        android:id="@+id/btnShannonCalculate"
        android:layout_width="wrap_content"
        android:layout_height="wrap_content"
        android:onClick="calcShannon"
        android:text="Calculate" />

    <TextView 
        android:id="@+id/label2"
        android:layout_width="fill_parent"
        android:layout_height="wrap_content"
        android:text="Result"
        android:gravity="center"
        android:textAppearance="?android:attr/textAppearanceLarge"/>
    
    <TextView
        android:id="@+id/lblShannonOutput"
        android:layout_width="fill_parent"
        android:layout_height="wrap_content"
        android:gravity="center"
        android:text="" />


    </LinearLayout>
    
        <LinearLayout 
        android:id="@+id/lnlConvertDecibelToSnr"
        android:layout_width="fill_parent"
    android:layout_height="wrap_content"
    android:orientation="vertical" >
    <TextView
        android:id="@+id/lblConvertDecibelToSnrTitle"
        android:layout_width="wrap_content"
        android:layout_height="wrap_content"
        android:text="Convert Decibel to SNR"
        android:gravity="center"
        android:textAppearance="?android:attr/textAppearanceLarge" />

    <TextView
        android:id="@+id/lblSnrDecibels"
        android:layout_width="wrap_content"
        android:layout_height="wrap_content"
        android:text="Decibels" />

    <EditText
        android:id="@+id/txtSnrDecibels"
        android:layout_width="fill_parent"
        android:layout_height="wrap_content" />
    
    <Button
        android:id="@+id/btnSnrCalculate"
        android:layout_width="wrap_content"
        android:layout_height="wrap_content"
        android:onClick="convertDecibelToSnr"
        android:text="Calculate" />
    <TextView 
        android:id="@+id/label3"
        android:layout_width="fill_parent"
        android:layout_height="wrap_content"
        android:text="Result"
        android:gravity="center"
        android:textAppearance="?android:attr/textAppearanceLarge"/>
    <TextView
        android:id="@+id/lblSnrOutput"
        android:layout_width="fill_parent"
        android:layout_height="wrap_content"
        android:gravity="center"
        android:text="" />
</LinearLayout>
    
        
</LinearLayout>